
 カレンダーの設定
ショップのトップページにカレンダーを表示できます。表示するカレンダーをの詳細設定ができます。
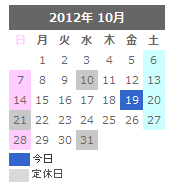
カレンダーの設定
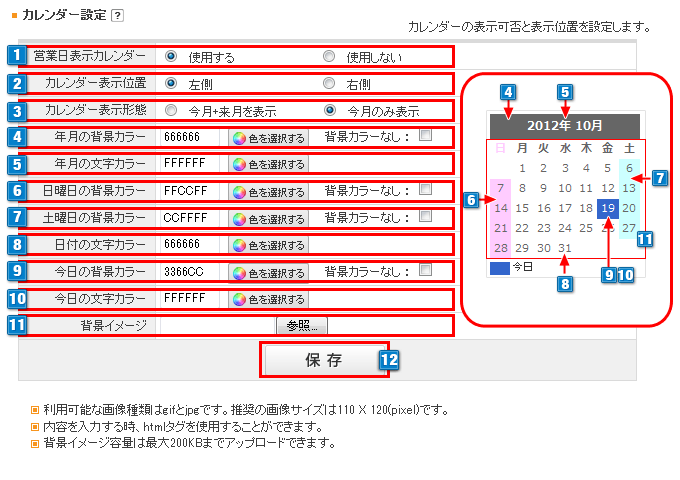
- 1ショップのトップページにカレンダーを表示するか否かを選択します。表示する場合は「使用する」を選択してください。
- 2カレンダーの表示位置を左側(左メニュー)か右側(右メニューがある場合は右メニュー)に表示するかを選択できます。
※ショップデザインご利用の場合は任意のカレンダータグを入力して表示します。
左側の場合:【ショップデザイン(PC)】>【トップページ編集】>【左メニュー管理】右側の場合:【ショップデザイン(PC)】>【トップページ編集】>【中央画面管理】
※カスタマイズテンプレートを選択している場合、カレンダー表示位置は「左側」を推奨しております。
「右側」を選択した場合は、別途【中央画面管理】にタグを入力し、
ショップ様にてデザインをご調整ください。(ビジネスプラン、カスタマイズテンプレート利用の場合は、右側にカレンダーは表示できません)
- 3カレンダーの表示形態を設定できます。今月と来月を続けて表示するか今月のみ表示するかを選択します。
- 4カレンダーの年月の背景カラーを指定できます。(色選択ボタンからカラーを選んでください)
背景カラーのを設定しない場合は、背景カラーなしにチェックしてください。 - 5カレンダーの年月の文字カラーを指定できます。(色選択ボタンからカラーを選んでください)
- 6カレンダーの日曜日の背景と(日)の曜日のカラーを指定できます。(色選択ボタンからカラーを選んでください)
背景カラーのを設定しない場合は、背景カラーなしにチェックしてください。 - 7カレンダーの土曜日の背景カラーを指定できます。(色選択ボタンからカラーを選んでください)
背景カラーのを設定しない場合は、背景カラーなしにチェックしてください。 - 8カレンダーの日付の文字カラーを指定できます。(色選択ボタンからカラーを選んでください)
- 9カレンダーの今日の背景カラーを指定できます。(色選択ボタンからカラーを選んでください)
背景カラーのを設定しない場合は、背景カラーなしにチェックしてください。 - 10カレンダーの今日の文字カラーを指定できます。(色選択ボタンからカラーを選んでください)
- 11背景イメージを挿入することができます。 赤い枠内で囲ったところ(曜日と日付の表示箇所)に背景画像を挿入することができます。
- 12上記の設定を変更する際は、必ず「保存」ボタンをクリックして反映してください。
日別内容入力
カレンダーに定休日や特別日などを設定し表示することができます。
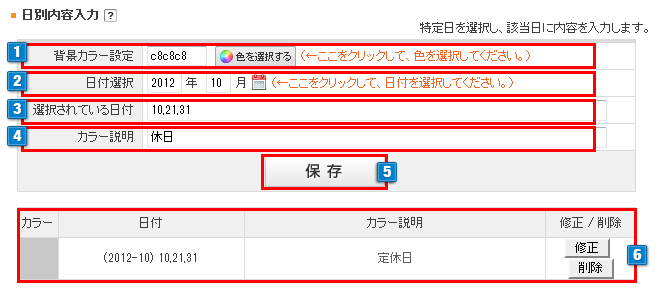
- 1設定したい日の背景カラーを指定できます。(色選択ボタンからカラーを選んでください)
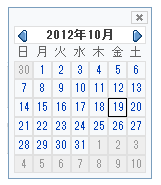
- 2設定したい日付を指定してください。(カレンダーをクリックして日付を選んでください)複数ある場合は、複数選択します。
- 32で選択した日付を確認することができます。
- 4設定した内容の説明を入力します。入力した文字はカレンダーに表示されます。(全角20文字入力可能)
- 5上記の設定を変更する際は、必ず「保存」ボタンをクリックして反映してください。
- 6設定した内容が表示されます。
修正したい場合は、「修正」ボタンをクリックすると一度設定した内容を修正することができます。
削除したい場合は、「削除」ボタンをクリックします。
注意日別内容入力で設定した内容はカレンダー設定(今日や、土曜日、日曜日の設定)よりも優先して表示されます。
クリエイターモードのカレンダー表示について
クリエイターモードにカレンダーを表示する場合、HTML記述が必要です。
【Complete】【BRothers】【Basics】【Manabito】【&more】のテンプレートは初期値に入力されており、『日別内容入力』の設定が反映されます。
そのほかのテンプレートでは『カレンダーの設定』の内容は反映されませんので、HTML記述をおこなってください。
『日別内容入力』でおこなった設定は、以下「サンプルソース」記載のJavaScriptを入力することで反映されます。
▼サンプルソース
(【Debut】テンプレートでお試しいただけるサンプルソースです)
※別途、cssによる調整が必要です。
html
<!--カレンダーここから-->
<div>
	<!--今月のカレンダータイトル-->
	<h2><{$calendar1.year}>年<{$calendar1.month}>月の営業日カレンダー</h2>
	<!--今月のカレンダーテーブル-->
	<{$calendar1.html}>

	<div>
		<!--今月のカレンダー下 今日テキスト-->
		<span style="color:#57886C">■</span>今日
	</div>
	<{section name=i loop=$calendar1.date_list}>
		<div>
			<!--今月のカレンダー下 特定日テキスト-->
			<span style="color:<{$calendar1.date_list[i].color}>;">■</span><{$calendar1.date_list[i].description}>
		</div>
	<{/section}>
	<!--今月の特定日の設定-->
	<{section name=i loop=$calendar1.date_list}>
		<{section name=j loop=$calendar1.date_list[i].day_list}>
			<input type="hidden" class="dayList" data-month="1" data-day="<{$calendar1.date_list[i].day_list[j]}>" data-color="<{$calendar1.date_list[i].color}>">
		<{/section}>
	<{/section}>
</div>

<div>
	<!--翌月のカレンダータイトル-->
	<h2><{$calendar2.year}>年<{$calendar2.month}>月の営業日カレンダー</h2>
	<!--翌月のカレンダーテーブル-->
	<{$calendar2.html}>

	<{section name=i loop=$calendar2.date_list}>
		<div>
			<!--翌月のカレンダー下 特定日テキスト-->
			<span style="color:<{$calendar2.date_list[i].color}>;">■</span><{$calendar2.date_list[i].description}>
		</div>
	<{/section}>
	<!--翌月の特定日の設定-->
	<{section name=i loop=$calendar2.date_list}>
		<{section name=j loop=$calendar2.date_list[i].day_list}>
			<input type="hidden" class="dayList" data-month="2" data-day="<{$calendar2.date_list[i].day_list[j]}>" data-color="<{$calendar2.date_list[i].color}>">
		<{/section}>
	<{/section}>
</div>
<!--カレンダーここまで-->
CSS
/* カレンダーのサイズ設定 */
.makeshop-calendar1,
.makeshop-calendar2 {
width: 100%;
margin: 0 auto 16px;
box-shadow: rgba(0, 0, 0, 0.1) 0px 4px 12px;
}

/* テキスト位置・罫線設定 */
.makeshop-calendar1 th,
.makeshop-calendar1 td,
.makeshop-calendar2 th,
.makeshop-calendar2 td {
box-sizing: border-box;
text-align: center;
border: 1px solid #e6e6e6;
}

/* 【曜日】テキストの太さ・背景設定 */
.makeshop-calendar1 th,
.makeshop-calendar2 th {
background: #dcdcdc;
font-weight: bold;
padding: 10px 0;
}

/* 【日付】テキストの太さ・背景設定 */
.makeshop-calendar1 td,
.makeshop-calendar2 td {
background: #fff;
font-weight: bold;
padding: 25px 0;
}

/* 【今日】テキストの太さ・背景設定 */
.makeshop-calendar1 td.today,
.makeshop-calendar2 td.today {
background-color: #57886C;
color: #fff;
}

/* 【日曜日】の設定 */
.makeshop-calendar1 th.sunday,
.makeshop-calendar2 th.sunday {
color: #fff;
background: #f08080;
}

/* 【日曜日】日付の設定 */
.makeshop-calendar1 tbody td.sunday,
.makeshop-calendar2 tbody td.sunday {
background: #f0808073;
}

/* 【土曜日】の設定 */
.makeshop-calendar1 th.saturday,
.makeshop-calendar2 th.saturday {
color: #fff;
background: #6495ed;
}

/* 【土曜日】日付の設定 */
.makeshop-calendar1 tbody td.saturday,
.makeshop-calendar2 tbody td.saturday {
background: #6495ed36;
}

/* 【月曜日】の設定 */
.monday {
color: black;
}

/* 【火曜日】の設定 */
.tuesday {
color: black;
}

/* 【水曜日】の設定 */
.wednesday {
color: black;
}

/* 【木曜日】の設定 */
.thursday {
color: black;
}

/* 【金曜日】の設定 */
.friday {
color: black;
}
@media screen and (max-width: 640px){
.makeshop-calendar1,
.makeshop-calendar2 {
width: 100%;
}
.makeshop-calendar1 th,
.makeshop-calendar1 td,
.makeshop-calendar2 th,
.makeshop-calendar2 td {
font-size: 14px;
}
}
JavaScript
// <!--特定日の設定-->
$(function(){
    $('.dayList').each(function(){
        var month = $(this).attr('data-month');
        var day = $(this).attr('data-day');
        var color = $(this).attr('data-color');

        $('.makeshop-calendar' + month +' .day' + day).css({
            'background-color': color,
            'color': '#fff',
            'font-weight': 'bold'
        });

    });
});
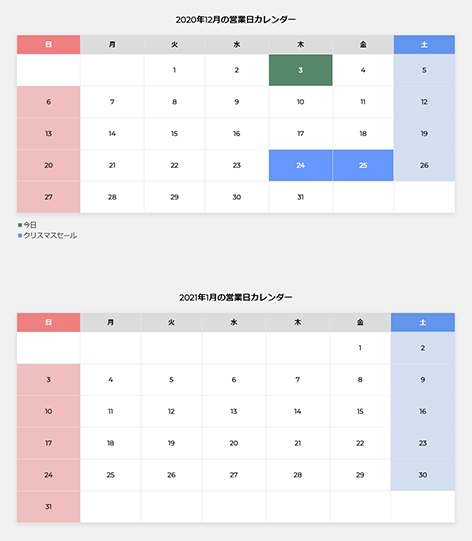
▼クリエイターモード【Debut】でカレンダーを表示した場合の表示例